Quilting How-To: Stitch and Flip
The
Stitch and Flip technique can be used to make many different blocks and patches.
Any block or patch with a triangle on one or more corner can be made using this
technique.
Stitch and Flip uses a little extra fabric but makes everything
so much easier! No more messing around with triangles!
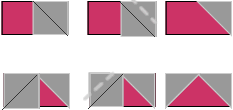
Here are just a few examples of blocks you can make using Stitch and Flip.


This how-to will use the first example block to teach the technique.
- Cut
- 9 1/2 square of white
- 6 1/2 in square of red
- 3 1/2 in square of yellow


Make flying geese is a similar process.
-
Cut a rectangle 6 1/2 x 3 1/2
-
Cut two squares 3 1/2
-
Align a square with one end of the rectangle. Mark and sew
the diagonal on the square. Trim off the corner 1/4 inch from the seam.
Press the seam towards the corner.
-
Align the second square on the opposite end of the rectangle.
Mark and sew the diagonal that forms a point with the first triangle. Trim
off the corner 1/4 inch from the seam. Press seam towards the corner.

Other tips and approaches:
- I typically toss the trimmings in the trash. If this seems wasteful to
you, stack up the pairs of triangles that you trimmed. Sew the long seam
on these pairs to make small 1/2 square triangles.
- Instead of marking the diagonal, lightly press (or finger press) a diagonal fold
on the top square as your line to follow.