Quilting How-To: Adding Borders to a Quilt
This how-to describes adding a simple border to a quilt.
Step 1: Measure for Border
- Measure your quilt's length and width in the middle of the quilt. The sides may have
become stretched and opposite sides may not be equal in length.
Even if your pattern tells you the length of border to use, double check it by
measuring in the middle of the quilt.
- Measuring the middle on a large quilt is not easy.
- Lay the quilt out fully on a flat surface such as the floor and
make sure it is smooth.
- Mark the center of each side with a pin. The center of each side
may be obvious based on the piecing pattern. If it is not obvious, measure
each side and find it's center.
- Have someone help by holding the end of the tape and use long measuring tape that is longer than the quilt.

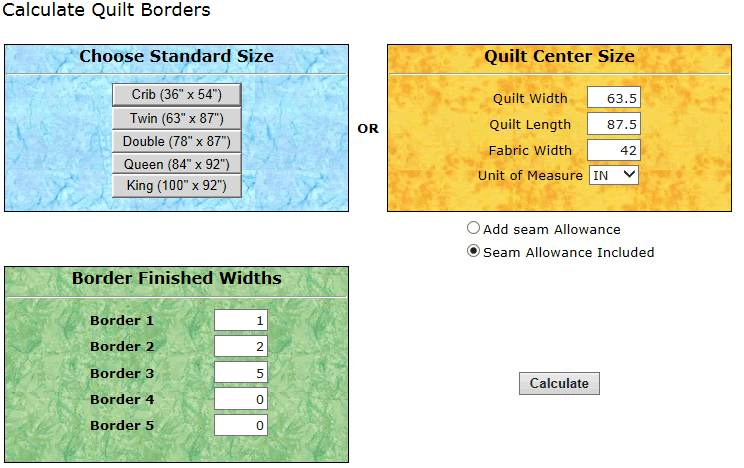
Step 2: Use MyWebQuilter Border Calculator
Enter your quilt dimensions in the MyWebQuilter.com
Border Calculator
.
- Enter Quilt Size - If your quilt is a "standard size" select the size on the left.
If it does not match the "standard size" buttons, enter your quilt width, length
on the right.
- Seam Allowance - Notice the selection button under the quilt size on the
right. If you have just measured the center, choose the option that seam
allowances are already included in your border measurement.
- Border Fabric Width - Also double check your border fabric width and change
the default value if necessary.
- Size of Borders - Next enter the finished size of your borders.
- Calculate - When you are finished, click the Calculate button.
- Keep the measurements on this screen handy as you work
on your borders.


Step 3: Cut and Piece Borders
- Add the border on the long side first. Sew enough strips together to
create a border strip the exact lengh of the quilt.
- Cut strips the Border Strip Width. Notice that seam allowance have been added to
this width.
- The calculator assumes strips are cut across the fabric (selvage to selvage) because this approach
typically requires less fabric. Trim off selvages on strips.
- You may choose to cut borders from the length of the fabric to avoid or minimize
piecing border strips.
- To piece your border strip, choose which of the three methods you
will use.
- Straight Grain Seams are the easiest. Simply join strips together with a
quarter inch seam.
- Mitered Seams with Straight Corners are used to make the seams less visible
however it uses more fabric.
Place two strips right sides together at right angles to each other. Mark and
then sew on the diagonal as shown below. Using a few pins to make sure the
strips stay aligned is a good idea. Trim off corner ¼ inch from seam. Press
seams open.
- Mitered Seams with Mitered Corners are
commonly used for stripped border fabric. This How-to does not cover this
advanced option of mitering the corner.
- Cut and piece 2 border strips to the exact length of the quilt.
Step 4: Sew Borders to Quilt
- Fold each border strip in half lengthwise and finger press to mark the center. Align the
center of the border with the quilt center and pin center right sides together.
- Pin each end of the border to the end of the quilt.
- Finish pinning the border to the quilt, easing any fullness.
- Sew border to quilt using a 1/4 inch seam.
- Press seam towards the border.
- Repeat to attach border on opposite side.

Step 5: Repeat Process for Quilt Width
-
Sew enough strips together to
create a border strip the exact width of the quilt including
the border on the quilt length that you just added.
-
Assuming your 1/4 inch seam was accurate, the Quilt Width for the border you are
working on in the Quilt Calculator is the width you need.
-
Pin and sew as described above.
Step 6: Repeat Process for Remaining Borders